

Kombucha Brewing Instructions
Introduction
Hi there! Ever wanted to brew kombucha at home? It's simpler than you think.
Kombucha is just sweet tea that's been fermented until it's fizzy and tangy. The SCOBY (a mix of bacteria and yeast) makes this transformation happen. Imagine brewing a large pot of tea, adding cane sugar, cooling it down, and then letting the SCOBY do its thing. The SCOBY is also called the mother, the mushroom, and the pellicle.
Brewing kombucha is about experimenting and adjusting to get the taste you like. Each batch allows you to explore different flavours, making your kombucha unique. Plus, you'll grow a new SCOBY with every batch, so you can keep brewing or share with friends. This process combines creativity and science, making kombucha brewing truly special.
Getting started
To start, you need water, cane sugar, tea (black is recommended), a SCOBY, starter tea, and a gallon-sized jar. You'll also need bottles for the finished kombucha, a clean cloth, and a rubber band to cover your jar.
Time and cost
From start to finish, it takes about 7-10 days to ferment a batch, but the actual work is minimal. Starting should be affordable and accessible, and brewing at home is much cheaper than store-bought kombucha. Plus, with each batch, you get a bonus: a new SCOBY.
What to expect
Each batch yields delicious homemade kombucha. You control the sweetness and fizz, and as you get more experienced, you'll always have kombucha on hand. Remember, the first batch might not be perfect, but it's a learning step toward better brews.
Equipment
- Kettle or a Pot to boil water
- 1 Gallon glass jar
- Tightly woven clean cotton cloth, or a clean handkerchief, clean old t-shirt, clean coffee filter, as long as the weave is tight enough to keep dust and insects out of your brew. Avoid napkins or paper towels to prevent microfibers from falling off the paper into the tea.
- Rubber bands
- Tablespoon to measure your loose-leaf tea
- Swing-top bottles or clean soda bottles
- Tea Filter or a French press if you are using loose-leaf tea
- Thermometer, you could eventually upgrade to a low-cost Stick-on Thermometer
- Small funnel, to fill your bottles
- Bottle Brush
Ingredients
- A SCOBY (Symbiotic Culture Of Bacteria and Yeast)
- Around 2 cups of Starter Tea (our Unboxed SCOBY jars are round 1.5 cups, and different recipes will range between 1.5 to 2.5 cups)
- 6-8 bags black tea, or we love to use 4 tbsp of Organic Fair-Trade Indian Black Tea loose tea
- 1-1.25 cups of cane sugar, we love using our Turbinado Sugar. (SCOBYs consume sugar to ferment, producing acetic acid and carbonation)
- 1 Gallon of filtered water
Instructions
- Boil a Concentrate: Start by dissolving 1 cup of cane sugar in 3 cups of boiling water. Once the sugar has dissolved, then steep 2-3 tablespoons of loose-leaf black tea to create a strong tea concentrate for 5-10 minutes. The longer you let your tea steep, the more nutrients will get added to the water to feed your starter tea and your culture. Then add it to your clean gallon jar and a bit of cold water to the bottom of the gallon jar so that it doesn’t crack when adding the hot water.
- Dilute and Cool: Fill the jar with about 10-12 cups of cool water to dilute a concentrated sweet tea. This will help cool the mixture down to room temperature more quickly and prepare it for the SCOBY to hang out and begin fermentation. Temperature is important in this step, and you should aim for anywhere between 21-29°C. Any hotter and the kombucha culture won’t be able to survive. Taking a reading with your thermometer is the best way to make sure that you are in the ideal temperature range.
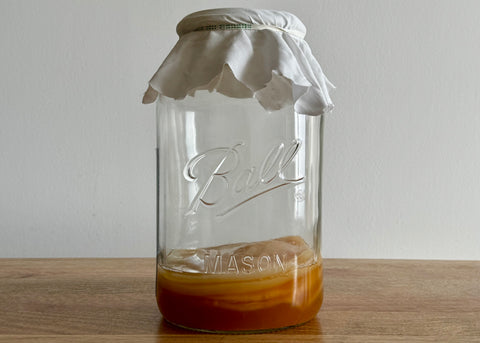
- Add the Magic: Introduce the starter tea from your jar or from a previous batch of kombucha. Then gently slide your SCOBY to the room temperature 1-gallon jar. Proper handling is key. Always wash your hands when you touch the SCOBY or kombucha. Once you slide your SCOBY in your room-temperature sweet tea, it can settle anywhere in the jar – at the bottom, sideways, or even in the middle – and it's completely fine.
- Cover It Up: Securely cover the jar with a clean cloth and rubber band to prevent contaminants and insects from getting in.
- Wait: The waiting is the hardest part. Place the jar in a spot away from direct sunlight, with a good enough airflow, like in a cupboard, and let it ferment at room temperature, anywhere between 21-29°C, to discourage mould growth and support healthy fermentation for 7 days. You will eventually end up with plain kombucha that is unflavoured and mostly non-carbonated. It will have a nice acidic tang.
- Second Fermentation (F2): To add carbonation and/or flavours, you need to go through a second round of fermentation process, called F2. Transfer the kombucha to airtight bottles for carbonation and/or flavouring. It’s important to leave some headspace in the bottles during F2 to avoid excessive pressure buildup, which could lead to bursting bottles. Burping the bottles daily to release excess pressure can also help. F2 can take anywhere from 1-3 days, based on your preference.
- Refrigerate and enjoy: Refrigerate to stop fermentation and carbonation, and then consume your kombucha within a month.
Continue the process by saving 2 cups (around 500 ml) from your current batch as your starter from Step 6 and repeat Steps 1-7.
Starter tea
Starter tea is a previously brewed batch of raw, unflavoured kombucha that has gone through a successful first fermentation. It is really important in the process. It’s actually more important than the SCOBY itself. Starter tea is where all the good and beneficial bacteria and yeast live, and it will acidify the kombucha and drop it to a low enough pH so it won’t be susceptible to mould or other harmful stuff. So make sure before you get started that you have a good amount of starter tea available to you. Once you have completed your first batch, during the first fermentation, set aside 1.5 to 2 cups of this liquid gold for your next brewing adventure. If you are flavouring during the second fermentation, it's a good idea to make at least 1 unflavoured bottle in case you need it as an option for the starter at some point.
Flavouring
Flavouring kombucha and understanding the First Fermentation (F1) and Second fermentation (F2) are key to customising your brew.
- F1, or the First fermentation, is where the magic starts. It's the process where your sweet tea turns into kombucha, thanks to the SCOBY. This stage is all about creating a healthy, balanced base.
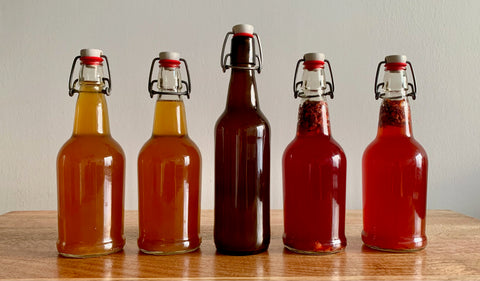
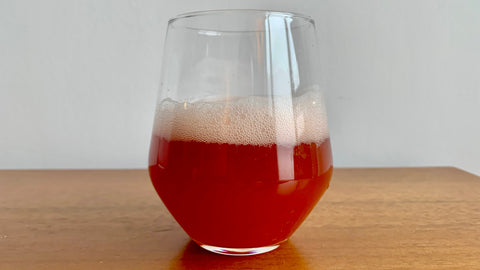
- F2, or the Second fermentation, is where flavour and fizz come into play. After removing the SCOBY, you can add flavours like fruit, herbs, or spices to the kombucha and seal it in a bottle. This stage lets the kombucha carbonate, turning it into a fizzy, flavoured delight. Ideas for flavouring include adding fresh fruit juice, ginger slices, or berries. Experimenting with different combinations during F2 can lead to delicious results! Remember to open it slowly over a sink to catch any potential overflow, especially if you suspect it might be over-carbonated especially from the extra sugar added with fruits and juices.
For flavouring your kombucha during the second fermentation (F2), here are some handy ratios to start with:
- Fruit: Use 10-30% fresh, frozen, or dried fruit to 70-90% kombucha. This keeps the flavours balanced without overwhelming the kombucha's natural zest.
- Juice: If you're opting for juice, a ratio of 10-20% juice to 80-90% kombucha works well. This gives a nice flavour boost while maintaining the kombucha's integrity.
Experiment within these ranges to find what tastes best for you!
Taking a Break
Going away for a few weeks? Simply start a new batch and leave it on your countertop. It'll turn vinegary while you're gone, but don't worry; the SCOBY will be hanging out and be just fine. If you're planning to be away longer, pop your SCOBY into a fresh tea and starter tea mix in the fridge. Remember to refresh it with new tea every 4 to 6 weeks to keep it happy and healthy.
The SCOBY Hotel
A SCOBY hotel is essentially a storage solution for your extra SCOBYs, which you'll start to accumulate once you get serious about brewing kombucha. Each time you brew, the SCOBY duplicates, leading to a surplus of SCOBYs. You can keep using your SCOBY again and again. They last for many uses before they get too old. You'll notice they turn a darker brown as they age. But it's okay to keep using them.
Taking a break from brewing kombucha? Store your SCOBYs in a SCOBY hotel, a practical move. This isn't merely storage; it's a SCOBY gym where cultures bulk up, brewing a robust starter tea for your next batch. Imagine a SCOBY doing tiny weights, gearing up for its next fermentation adventure.
Fixing Common Kombucha Brewing Problems
Brewing kombucha at home can be fun, but sometimes you run into issues. Here's how to solve some common problems:
Mould
Making kombucha at home can feel daunting due to mould concerns, but with some knowledge, it's very manageable. While mould can spoil the batch and is unhealthy, this is rare when you follow the right steps.
The key is understanding the process and keeping things clean. Homemade kombucha offers great benefits, like being good for your gut and letting you play with flavours. Don't let the fear of mould hold you back. With clear guidance and a bit of care, you'll find that brewing kombucha is both safe and rewarding.
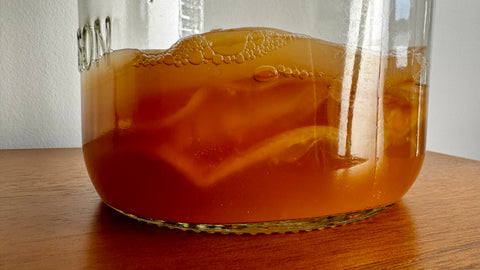
When you make kombucha, a new SCOBY might start to grow on top of the liquid after three days. You'll see white spots. These spots are usually the beginning of a SCOBY. If you're not sure whether it's mould or a SCOBY, wait a few more days. Kombucha mould doesn’t look different from the classic type of mould you would see on bread, cheese, or fruits and veggies and looks like fuzzy green, black, or blue circular spots. If you see this kind of mould, you need to throw out everything, including the SCOBY. To keep mould away, clean everything you use to make your kombucha. Ensure you cool the tea before you add the SCOBY. Cover the jar tightly to keep anything out. Keep the place where you're making kombucha warm.
A good SCOBY should look smooth, slightly shiny, and feel slippery to the touch. It's normal for it to range in colour from a pale, creamy white to various shades of tan and even light brown, depending on its age and the types of tea used in brewing. The SCOBY might have some darker spots or streaky bits, usually tea particles or yeast formations, which is perfectly normal.
Not fizzy enough
If your kombucha isn't bubbly, let it ferment longer during the second stage. Keep it at room temp for a few more days with the bottles sealed tight. Adding more fruit or a little extra cane sugar can also make it fizzier.
Too tart or too sweet
The perfect kombucha is a mix of sweet and tart. If it's too vinegary, ferment it less next time. If it's too sweet, let it ferment longer. Start tasting it on day 7 to find what you like best.
Smells and tastes yeasty
A strong yeasty smell or taste means the yeast is too active. Move your brew to a cooler place to slow it down. You can also strain out the yeast bits from the bottom before making a new batch.
No signs of fermentation
If you don't see bubbles or changes in taste after a few days, check the temperature. It should be warm (21-29°C), and your SCOBY should be healthy. Make sure the tea isn't too hot when you add the SCOBY, or it might kill the good stuff.
Cloudy kombucha or sediments
It's normal to see cloudiness and bits at the bottom, especially early on. These are just part of the process. Keep the brown stringy parts on your SCOBY. Those are yeast, and they help make your drink bubbly. If your SCOBY is mostly covered in yeast, you can remove a bit. But leave some behind. This shows your kombucha is fermenting right. If the bits bother you, just strain them out before you drink it or start the second fermentation.
Other problems
If your SCOBY looks thin, torn, or like it's disappearing, don't worry. It can still work. Make sure it's not too cold, and use enough starter liquid. If your F1 gets too cold, try wrapping it with towels to keep it warm over the course of the 7 days. Sometimes, especially in the winter, your SCOBY might not produce a whole new SCOBY, and that’s okay.
Be cautious with metal: while using metal utensils briefly is okay, avoid fermenting or storing kombucha in containers that contact metal for extended periods. Metals, particularly reactive types like aluminum, can impart a metallic taste to your kombucha and may harm the SCOBY over time.
Community
The kombucha community is an awesome group of folks who love making and drinking kombucha. Everyone helps each other out, sharing recipes, tips, and encouragement. There are many kombucha brewing forums, social media groups, or local workshops where you can seek advice, share experiences, and get encouragement from fellow brewers. It doesn't matter if you're just starting or you've been brewing for years; there's always something new to learn and someone ready to help.
Enjoy the journey
Brewing kombucha is about exploring and enjoying the process. It’s more about feeling it out than strict rules. Each batch is a chance to improve and customise your brew and your process. Don't worry if the first batch isn't perfect; it's all part of the journey.
Happy brewing!
Our sincere thanks to Denis for helping us compile this resource, in an effort to offer you a detailed how-to for making your own Kombucha.
Disclaimer
We share the methods and opinions we use in our own home to help you, but please note that Unboxed Market cannot be held responsible for any outcomes that may result from following the tips provided on our website. This resource is meant to be helpful, and you're welcome to use or ignore the advice as you see fit. However, because everyone's circumstances are unique, we cannot guarantee that you'll achieve the same results we do by following our guidelines. Please note that we do not make any medical claims about kombucha. If you have any concerns or questions about your health, please consult with a physician or other healthcare professional.
Add a comment